|
Tutorials
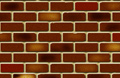
Create a Brick Wall in Photoshop
10/10/2002
A brick wall is a collection of small rectangular stone-textured
shapes, usually fairly symmetrical in placement. You can build
a brick wall by creating the shape for the wall and filling it
with a pattern. With a little further modification you can add
a sense of randomness to the bricks. It's easy to create the
basic pattern. I'll show you how it's done on today's show.
1. Make the grid visible (View>Show>Grid).
2. Go to the Preferences dialog box for the Grid.
3. Click Edit>Preferences>Guides, Grid & Slices under
Windows or Mac OS 9.1 and later. Click Photoshop>Preferences>Guides,
Grid & Slices under Mac OS X.
3. Set the grid subdivisions to 11.
In order to make it easy to create and select, I changed the grid
subdivisions in the Preferences dialog to an uneven number. The
odd-numbered square in the grid creates the space necessary for
the grout between the bricks. The high number makes the subdivisions
small enough for the size of the grout.
4.Create a new layer. Zoom in so that one grid section takes up
the entire screen. This will make it easier to see what you're
doing.
5. With the rectangle selection tool, select a rectangular shape
that takes up four subdivisions down and 11 across.
6. Fill the selection with a color similar to that of a brick.
7. Clone the brick over to the right and then down to form the
pattern. Make sure that the spacing between each brick is one grid
subdivision. Place the brick on the second row so that it's centered
below the two bricks above.
8. Make sure the background is transparent by clicking off the
eye icon in the background layer. Now return to the top layer and
use the Rectangular Marquee tool to select the bricks. Turn them
into a pattern by selecting the Define Pattern option in the Edit
menu (Edit > Define Pattern). Take note of the specific area
being selected. This will ensure that the pattern will be accurate.
The excess grid area selected to the left and below the bottom
brick will create the grout area on the opposite side of the brick.
Where one edge of the pattern ends, the other picks up. This is
called step and repeat.
9. Once the pattern is created you can deselect (Command-D on
a Mac, Control-D on a PC).
10. Zoom back out to 100 percent view and turn off the eye icon
for the layer where you created the pattern. Turn back on the
eye icon for the Background layer.
11. Create a new layer and fill it with the pattern of bricks.
You can do this by pressing Shift + Delete or by choosing
Fill from the Edit menu. In the Use section of the dialog box,
choose
Pattern and, in the Custom Pattern window, select the bricks
pattern.
12. A layer for the wall itself is created behind the area
with the bricks. This layer is filled with the color you
want for
the grout. Apply the Add Noise filter with an amount adequate
for simulating
the rough quality of grout.
13. Now you need to add texture to the bricks. The Add
Noise filter does the trick. The amount is less than
the amount
given to the
grout and it's put in Monochrome mode.
14. Select the layer with the brick pattern. Double-click
it in the layer's palette to bring up its Layer Style.
Apply Bevel
and
Emboss. Choose Outer Bevel for the Style. This adds
dimensionality to the bricks and makes them look like they're
protruding
from the wall.
15. You need to attain the random nature of a brick
wall. With the Dodge and Burn tools, you dab random
bricks
with the brush
set to the size of the height of a brick. Randomly
darkening and lightening individual bricks will give
the wall a
more realistic look.
Adding an occasional crack here and there adds even
more realism. By using a tiny paintbrush set to
a dark color,
you can create
little cracks. For added wear and tear, use a small
Eraser tool and hit the edges of the bricks to
take away the
hard edges.
|