|
Tutorials
Creating lightning
06/16/2004
Creating lightning is a snap with a couple of filters and adjustments.
The main filter used to create the lightning looks at areas of
contrast to determine shape.
1. On a blank, white Photoshop canvas, paint a black shape with
a large Paintbrush that will follow the basic line you want your
lightning bolt to be. Keep in mind it is the edges of the stroke
that will be the actual lightning.
2. If you want a second bolt then paint it on the opposite side
of the first paint stroke.
3. Fill in the area between the two strokes.
4. Apply a Gaussian Blur (Filter>Blur>Gaussian Blur) filter
with an amount large enough to heavily blur the shape (about 25).
5. Apply the Difference Clouds filter (Filter>Render>Difference
Clouds).
6. Invert the image (Image>Adjustments>Invert).
7. In Levels (Edit>Adjustments>Levels), move the black slider
to about 130 and the gray slider to .25.
8. If your second bolt is to be attached to the first then select
it and send it to its own layer (Layer>New>Layer Via Cut).
9. Put that new layer in Screen Mode and position it where you
want it. Flatten the file making sure all areas outside the lightning
are black.
10. Transfer the file over to the document you want the lightning
to appear in and put it in Screen Mode for the Black to disappear.
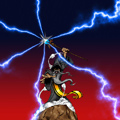
Wizard Lightning
This is a slight variation to the above effect in that you will
create many lightning bolts streaming from a central point. If
the source of the lightning is not in the center of the image
then it is crucial to make the file where you are creating
the lightning
larger than the file where it will be placed so that you have
enough room to make the lightning bolts bleed off the page.
1. In a Photoshop file like step one above, draw a series of
long, vertical black rectangles. Each rectangle will produce
two lightning
bolts. The more rectangles, the more bolts you will have.
2. Blur the shapes as above.
3. Apply the Polar Coordinates filter (Filter>Distort>Polar
Coordinates) with the Options set to Rectangular to Polar.
4. Now follow steps five through seven in from the above tutorial.
5. To add color to the bolts use the Hue/Saturation control (Image>Adjustments>Hue/Saturation)
set to Colorize. Play with the Hue and Saturation sliders till
you get the desired effect.
|