|
Tutorials
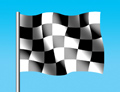
Create a Racing Flag
03/05/2004
I'm back from this year's PhotoshopWorld Conference & Expo
and ready to show off some new image-editing tricks.
On tonight's episode of "The Screen Savers" I've got
a nice project for all you NASCAR dads (and moms) out there. I'll
show you how to create a checkered racing flag using Photoshop.
Making a checkered flag sounds easy enough, but we'll also add
filters to our image to make it look like it's really flapping
in the wind. Let's start our engines and get going.
1. Open a new
Photoshop document and turn on the Grid (View>Show>Grid).
2. With the Rectangular Marquee tool, select a square section
and fill it with black.
3. Duplicate the square to the lower right so the corners of
each square touch.
4. Select both squares from edge to edge so you have a selected
area that encompasses both black squares.
5. Turn the squares into a pattern (Edit>Define Pattern).
6. After you've created the pattern, delete the squares and turn
off the grid (View>Show>Grid).
7. Fill the background with a blue gradient to look like sky.
8. Create a new layer.
9. With the Rectangular Marquee tool, select the shape you want
your flag to be.
10. Choose Fill from the Edit menu. In the dialog box that pops
up, choose Pattern for Use and select the checkerboard pattern
you just created. If it does not fill it perfectly, you can trim
off the bad edges.
11. Create a new layer above the flag layer by clicking the Make
New Layer icon at the bottom of the layer's palette.
12. Fill this layer (Edit>Fill) with 50 percent gray. Lower
the opacity slightly for the gray-filled layer so you can see the
flag beneath it.
13. Using a large airbrush tool (the exact size of the airbrush
is the size you wish the flag's folds to be), spray black tones
across the flag at various places. Spray white tones on different
sections of the layer above the flag. Return the opacity for the
layer to 100 percent. You might want to soften the tones a bit
by giving the layer a Gaussian Blur filter (Filter>Blur>Gaussian
Blur).
To create the effect of a flag waving in the wind, we'll use
the Displace filter. This filter uses one image, called a displacement
map, to bend the pixels of another. It looks at the luminosity
values (lights and darks) in the displacement map image, then
alters
the pixels of the image you wish to modify.
A value of 50 percent gray will have no effect. Any values lighter
than 50 percent will bend pixels up and to the left. Values darker
than 50 percent will bend pixels down and to the right.
1. The Displace filter needs two images to do its trick. Select
all (Select>All) and copy everything to the clipboard.
2. Create a new file. Photoshop will create a file with the exact
dimensions of the contents of the clipboard. Paste the clipboard's
contents into your new file and save it. This image will be used
as the displacement map.
3. Back in the file with the flag, select the layer with the
flag. Turn off the Eye icon for the layer with the airbrushed
tones in
it. This will hide that layer from view.
4. Choose the Displace filter (Filter>Distort>Displace).
Leave the settings as they are and press OK. A second dialog box
will pop up asking for the displacement map. Choose the image you
created for the map. This will distort the flag to simulate the
wind-tossed look.
5. Select the layer with the airbrushed tones in it. In the Layers
palette, set the mode to Hard Light. Reduce the opacity. This
creates the highlights and shadows necessary to give the flag
a realistic,
3-D look.
6. If you're using a Mac, press and hold the Option key; on a
PC, press and hold the Alt key. While holding down the button,
click
between the layer of the flag and the layer of the tones in the
layers' palette. This creates a Clipping Group of the two layers.
7. Merge the two layers into one and distort the layer (Edit>Transform>Distort)
to a shape similar to a flag hanging from a pole. The end result
is a flag waving in the wind.
|