|
Tutorials
Shadows Over Rough Surfaces
5/6/2003
Creating the illusion of shadows cast over the ground is a simple
process. Just follow these steps.
1. Duplicate the layer of the object casting the shadow.
2. Lock its transparency, fill it with black, and lower its opacity.
3. Distort the shadow (Edit>Transform>Distort) to simulate
the shadow being cast across the ground.
4. If the ground has a rough-textured surface, then you must
displace the shadow to follow the texture.
5. Separate the file and make the ground surface the only layer
showing.
6. Save it.
7. In the file with the shadow, duplicate the layer of the shadow.
8. Select one of the layers with the shadow and choose the Displace
filter (Filter>Distort>Displace).
9. In the dialog box that opens, press OK.
10. A second dialog box will open, asking for a Displacement
Map. This is the file you created with the ground texture.
Choose it
and press OK.
11. The shadow will now distort to follow the texture of the
ground.
12. If part of the ground has no texture, the shadow should be
smooth in that area. This is where the second shadow layer comes
in.
13. Select the smooth area of the ground and put it in its own
layer.
14. Put the layer with the distorted shadow behind the layer
of the smooth ground.
15. Place the layer with the smooth, undistorted shadow above
the layer with the smooth ground and convert the layers into
a clipping
group. Press Option + Alt and click between the two layers in
the layers palette.
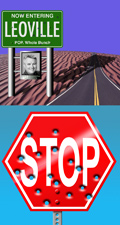
Bullet holes and rivets
1. In a layer, create the signpost of whatever you wish.
2. Create a new layer to contain the rivets that attach the sign
to the poles.
3. With the Circular selection tool, select small circles to
represent the rivets.
4. Fill it with any color you wish.
5. Call up the Layer styles for the layer with the rivets.
6. Apply a Bevel and Emboss. You can play with the settings until
you get what you want but make sure you are using an Inner Bevel.
Press OK.
7. Go to the Blending Options section of the Layer Styles and
pull back the Fill Opacity to zero.
8. Creating the bullet holes is exactly the same as the rivets,
with some minor changes.
9. Make the Bevel and Emboss an Outer Bevel.
10. Turn off Global Lighting and set the light direction to the
opposite of the rivets.
11. Change the Fill Opacity to zero, as with the rivets. Press
OK.
12. Make the layer with the holes a selection.
13. Go to the layer with the sign and press Delete. This will
make the holes transparent on the sign.
|