|
Tutorials
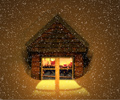
Create a Winter Wonderland
12/06/2001
In this Adobe Photoshop exercise, we will dramatically change
the mood of an image using the Lighting Effects filter and
a few
alpha channel and Pen tool tricks.
The first thing to do is change the mood by changing the time
of day. The image is daytime, which will be converted to
night.
1. Click on the Filter menu in Photoshop, point to Render,
and select Lighting Effects. This brings up the filter's
dialog box,
which offers a wide variety of controls. The left side of
the box provides a work and preview area. Multiple light sources
can be
added by dragging the small light bulb icon from below the
box and placing it where you want the light to originate.
Likewise,
lights can be deleted by dragging them into the Trash icon
at the bottom. Style has a variety of preset lighting conditions.
New
sets can be saved into this menu or deleted.
2. The Light Type gives you three choices for the characteristics
that your light will have. I chose Omni, which centers
the light source, since the effect is the light emanating from
the window.
The center of the light is moved so that it is centered
within
the window frame.
3. Clicking on the box at the far right of the Light Type
section of the dialog box allows you to select the color
of the light
source. The Color Picker pops up and a bright yellow/orange
is selected.
The same box in the Properties section allows you to
choose the color the light will fade off to. This time a dark
blue is selected.
The result can be viewed in the preview portion of the
dialog box. Click OK to apply the effect.
4. With the Rectangle selection tool I selected the windowpanes.
I sent them to their own layer by clicking on the Layer
menu, pointing to New, and then selecting Layer via
Copy. A picture
of an interior
room scene is imported into the file. The scene is
then grouped with the layer of the windowpanes (Option/Alt
click between
the two layers in the layers' palette) so that the
room scene seems
to be within the windows.
5. Next, the effect of the interior light spilling
out from the window has to be created. In the scene,
the
snow creates
a bank
that drifts away from the window. This would cause
the reflected light to dissipate as it goes round
the bend.
To achieve
this effect a blank alpha channel is created (click
on New Channel
icon at
the bottom of the Channels' palette).
6. With the Gradient tool, create a gradient from
black to white so that the gradient appears at
the bottom
of the image
where
the light will appear.
7. Now it is necessary to create the shape of the
light from the window. With the Path tool create
a set of
paths that
take on the
desired shape.
8. Load the alpha channel as a selection by going
to the Channels window and dragging it over
the Make Selection
icon at the
bottom of the palette or Command/Control-clicking
on it
in the Channels'
palette. The marching ants will appear and
display the selection from the 50 percent gray to the
white of the
alpha channel.
9. In the Paths window, click once on the Path
previously saved to bring it up on the image.
The path will
appear over the
image and the marching ants of the current
selection. On the upper
right corner of the Path palette is a small
arrow. Clicking on it will
drop down a menu with options for the paths.
Choose Make Selection.
10. In the dialog box that pops up, a Feather
of 2 is entered to soften the edges. Since
a selection
is
currently
active,
the alpha
channel, the Operations box is fully available.
Intersect with Selection is chosen.
11. Using the Color Picker, a bright yellow
is chosen. Choose Fill from the Edit
menu. The Foreground
color
with an Opacity
of 85
percent is chosen.
12. As a final touch, add falling snow. This is done by creating
a new layer. The layer is filled with black. The
Add Noise
filter
(click on
the Filter
menu, point
to Noise, and select Add Noise) is
used with a large amount and Gaussian
for the Distribution. The layer is
then blurred (click on the Filter menu, point
to Blur,
then select Blur
More). The
Levels
command
(click on the Image menu, point to
Adjust, then select Levels) is then used to increase
the contrast.
The
dark and light
sliders are forced towards the center.
Finally the layer is put into
Screen mode to allow the white to be
seen.
|