|
Tutorials
Make an Underwater Scene
06/27/2003
"
Finding Nemo" is a huge hit so I thought it would be fun to
teach you how to reproduce an underwater scene in Photoshop (in
six minutes!).
1. Start with an image with rocks in the foreground to serve
as the ocean bottom.
2. Using the Hue/Saturation control (Image>Adjustments>Hue/Saturation)
push the Hue slider all the way to the left. Push the Saturation
slider slightly to the right.
3. Create a new layer.
4. Choose a dark blue for the Foreground color and a bright blue
for the Background color.
5. Use the Gradient Tool to make a gradient with the light blue
at top and the dark blue at the bottom.
6. Apply the Glass filter (Filter>Distort>Glass) to the layer
with the gradient. Push the Distortion and Scaling all the way
up. Click OK.
7. Zoom out so you can see the gray work area around the image.
8. Choose Edit>Transform>Distort to get the Distort function.
When Distort comes on, you will see handles at the four corners
and one handle centered on each side of the image. Grab the center
handle at the bottom and raise it up to about the halfway point
in the image.
9. Grab the upper left handle and drag it out to the left of
the image a couple of inches. Grab the handle at the upper
right and
drag it out to the right. Press Enter to execute the distortion.
10. Create a layer in between the Background and the layer with
the gradient.
11. Set the Gradient Tool to Foreground to Transparent. This
is done in the Options Bar for the tool on the upper left,
icon with
the colored gradient visible.
12. In the new layer create a gradient that connects the bottom
of the layer with the top of the water and flows down into
the scene.
13. Now we will create the particulate matter that floats around
in the ocean. Create another layer and fill it with black. Make
sure this layer is at the top of all the other layers in the
layer palette. Add a little noise (Filter>Noise>Add Noise) in Monochromatic
and Gaussian mode.
14. Blur the noise (Filter>Blur>Blur More).
15. Choose the Levels control (Image>Adjustments>Levels).
When the dialog box appears, you will notice a high hill towards
the left (dark tones) in the Histogram. Push the black slider in
to line up with the point where the hill hits bottom on the right.
Bring the white slider in towards the black just enough to expose
some of the noise. Click OK.
16. Set that layer to Screen Mode and reduce its opacity.
Shafts of light
We will now create the shafts of light penetrating the water
from above. Make sure you are still zoomed out to display gray
work
area.
1. Create another new layer. Choose the Polygonal Lasso Tool
and set the Feather to a large number such as 20. Select a
tall, thin
cone shape and fill it with white. Bring down its opacity.
2. Duplicate the layer with the shaft of light and skew it slightly
(Edit>Transform>Skew). Move this new layer away from the
original shaft of light so that the top of the shaft is close to
the other. Change the opacity for this layer so it looks different
from the other. Duplicate these steps a few times.
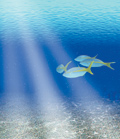
3. Add some fish from some other image or create your own and
you're done.
4. Lower the Opacity and apply a Layer Mask to have the furthest
portion disappear.
You're done!
|