|
Tutorials
Icy Letters
7/23/2003
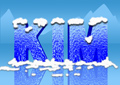
Every time I come on "The Screen Savers" I try to think
of a fun and artistic Photoshop project. Today I'm showing you
how to make your own winter landscape from scratch and create an
image similar to the one I created for TSS segment producer, Kim
Kinst.
Start landscaping
1. In a new Photoshop file, select the top half of the canvas
with the Rectangular Marquee Tool.
2. In the selection, create a gradient with the Gradient Tool
that has a dark blue at top to a lighter blue at the bottom.
3. In the Select menu, choose Inverse.
4. Make a New Layer.
5. Fill the selection with another gradient with a blue, lighter
than the previous light blue going down to a very light blue
at the bottom of the canvas. Deselect.
6. Make a new layer between the Background and the layer with
the lighter gradient.
Making mountains
1. With The Pen Tool, make some shapes to resemble mountains
along the horizon (where sky and land meet).
2. Make the path a selection and give it a gradient of light
blue at top to a darker blue at bottom.
3. Lower the Opacity of the mountain layer to make them seem
soft and distant.
Add your text
Now you need to make the letters. You want the edges of the type
to be rounded.
1. Choose the Horizontal Type Mask Tool and type whatever you
wish in whatever font you would like.
2. Turn the text that comes in as a selection into an Alpha channel
by clicking Select and Save Selection.
3. Deselect.
Icy letters
1. Blur the Alpha channel enough to make the word soft (Filter>Blur>Gaussian
Blur).
2. Using the Levels command (click Image>Adjustments>Levels),
push the white and black sliders inward to sharpen the word and
make it rounded.
3. Go back to the RGB channel. Make a new layer in the Layer
palette.
4. Load the Alpha channel into a selection by Command/Ctrl-clicking
it in the Channel's palette.
5. Fill the selection with a radial gradient from light blue
in the center to a dark blue.
6. Apply the Glass filter by clicking Filter, Distort, and Glass.
Adjust the settings to give the letters an icy look.
3D icy letters
1. Duplicate the layer of the text.
2. Bring up the Layer Styles dialog box for the top text layer.
3. Apply a Bevel and Emboss. Adjust the settings till you get
a three-dimensional look to the letters. Change the color for
the
Shadow Mode at the bottom from black to a deep blue.
4. Select the second text layer and scale it down slightly. Click
Edit, Transform, and Scale.
5. Position it as centered behind the main text and deepen the
colors with the Levels command. Click Image, then Adjustments,
then Levels.
Snowy finishing touches
1. Create a new layer above all the rest.
2. With a hard-edged Paintbrush and white, paint in little snowdrifts
at the bottom of the letters and hanging from the top.
3. Give the snow a little noise. Click Filter>Noise>Add Noise).
4. Apply a similar Layer Style as you did to the letters.
Create a letter reflection in the ice
1. Merge the two layers with the text. Duplicate the resulting
layer.
2. Flip it vertically. Click Edit>Transform>Flip Vertical.
3. Lower it to a position under the original letters to look
like a reflection.
4. Lower the Opacity and apply a Layer Mask to have the furthest
portion disappear.
You're done!
|