|
Tutorials
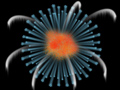
Create Fireworks in Photoshop
12/30/2003
In this tutorial we'll create a few different types of fireworks
in Photoshop. We'll make the first type with a custom brush.
Then we'll add wind effects and explosions in subsequent layers.
Create fireworks using a custom brush
1. Open a new Photoshop file.
2. Select the Paintbrush tool.
3. Select a small, soft-edged brush tip. Choose a size about
as large as you want the streaks of your fireworks.
4. Lower the paintbrush's Opacity setting to about 50 percent.
5. Go to the Brushes palette by selecting Window>Brushes.
6. Uncheck the Shape Dynamics box in the Brushes palette.
7. Check the box next to Other Dynamics and go to that section
in the palette.
8. Set the Opacity Jitter Control to Fade. Give it a value of
about 50. The higher the number, the longer your fireworks'
tails will
be.
9. Back in the image, click once in the upper part of the canvas.
10. While pressing the Shift key, click the bottom of the canvas
directly below the first click. Leave enough room between clicks
for the streak to be complete.
11. Set the Opacity of the Paintbrush tool to 100 percent.
12. Choose one of the Spatter brush tips. Your selection should
be slightly larger than the brush you used to create the streak.
Click once at the top of the streak.
13. Select the brush shape with the Rectangular Marquee tool.
14. Define it as a brush by selecting Edit>Define Brush Preset.
15. Select the Paintbrush tool and the brush tip you just created.
16. Open the Brushes palette (Window>Brushes) and go into the
Brush Tip Shape section. Separate the tip shapes by increasing
the Spacing to about 150 percent.
17. Go into the Shape Dynamics section and turn off the Size
Jitter control. Set the Size Jitter slider to about 25 percent.
This randomizes
the size of the brush tips.
18. Set the Angle Control to Direction.
19. Go to Image>Adjustments>Invert to invert the canvas and
make it black.
20. Create a new Layer.
21. With the Elliptical Marquee tool, select a perfect circle
by holding down the Shift key while selecting the shape. Drag
and
drop the circle to the center point of where you want the streaks
to flow.
22. Convert the selection to a Path. Click the "Make workpath
from selection" button at the bottom of the Path palette.
23. Select the Paintbrush tool, the brush tip you created, and
a bright yellow for the Foreground color.
24. On the bottom of the Path palette, click the Stroke path
button.
Your first set of fireworks is now complete.
Add Wind Effects to Your Fireworks
1. Create a new layer.
2. With the Pen tool, create a path that starts outside the fireworks
cluster and curves into the center of the cluster. Create a few
more paths that start from the outside and work in toward the center.
3. Choose the Paintbrush tool, a small, soft-edged brush tip,
and white as the Foreground color.
4. Go to the Brushes palette and set the Fade to about 80 in
the Other Dynamics section. Make sure Shape Dynamics is turned
off.
5. In the new layer, stroke the paths with the brush as you did
in the first set of fireworks.
6. Rotate the layer by selecting Edit>Transform>Rotate 90
degrees CW.
7. Apply the Wind filter from the right by selecting Filter>Stylize>Wind.
8. Select Edit>Transform>Rotate 900 CCW to rotate the layer
back to its original position.
Your second set of fireworks is done.
Make Your Fireworks Explode
1. Finally, create another new layer.
2. Choose the Paintbrush tool.
3. Choose one of the large Spatter brush tips.
4. Go to the Brushes palette and click the Brush Tip Shape section.
Increase the Spacing to about 70 percent to separate the tip shapes.
5. Go to the Shape Dynamics section and set both the Size and
Angle Jitters to 100 percent. Make sure the control is turned
off.
6. Go to the Color Dynamics section and set Foreground to Background
Jitter to 100 percent. Make sure the control is turned off.
7. Choose a bright yellow for the Foreground color and a bright
red for the Background color.
8. Paint a glob in the center of the fireworks.
9. Select Outer Glow in the Layer Style settings for the layer
with the red and yellow bursts.
10.Increase the Size to get a strong glow around the shapes of
the layer.
Now you're done!
|