|
Tutorials
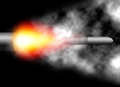
Speeding Bullets
05/27/2003
Editor's note: On May 6, Bert Monroy stopped by the studio to
show off two fancy Photoshop tips. Unfortunately we ran out
of time
and had to skip his bullet hole effect. Tonight he'll demonstrate
that tip as well as explain how to create the appearance of
a speeding bullet.
Creating a speeding bullet
1. In a new Photoshop file, make the background black by pressing
Command and the letter I (Control + I in Windows).
2. In a layer on the left, make a thin rectangular selection
and fill it with a gray gradient to serve as the gun barrel.
It should
bleed off the page on the left and extend slightly into the picture.
3. In another layer make a shape filled with a gray gradient
to serve as the bullet. If you don't already know, do a little
research
to determine what a bullet projectile looks like.
4. Duplicate the layer with the bullet and apply the Motion Blur
filter (Filter> Blur>Motion Blur) at a high amount.
5. Move the blurred layer to the left so the resulting streak
starts at the back of the bullet and runs toward the end of
the gun barrel.
6. Choose the Pen Tool.
7. Place the cursor just about at the middle of the bullet, centered
vertically with the bullet.
8. Click and drag a point toward the gun barrel so that you get
a handle about an inch long behind the point where you clicked.
Hold down the Shift key to constrain the handle to a perfectly
horizontal position.
9. Place the cursor just at the edge of the gun barrel and centered
vertically with the barrel.
10. Click and drag, but this time drag the handle down, creating
a curved line that should be curved enough to form the top
part of the gun flash (about a 2-inch handle).
11. Place the cursor over the first point you created. The cursor
should get a small zero that signifies that you're about to close
a path.
12. Hold down the Option key (or Alt key) and click the point.
13. Drag the handle until it matches the original handle you
got when you started the path. The result should be a sideways
teardrop
shape.
14. Choose "Make Selection" from the pull-down menu of
the Path's palette. Give the selection a large Feather of about
50.
15. In a new layer, fill the selection with a bright red color.
16. Deselect.
17. Select the path in the Path's palette.
18. Choose the Pen Tool in the Tool's palette. You'll notice
that the Transform controls under Edit convert to say Transform
Path.
19. Select Edit>Transform Path>Scale Path.
20. Shrink the path so that it's smaller than the original.
21. Make it a selection, as before, but with a lower Feather
of about 35.
22. In a new layer, fill the selection with a bright yellow.
23. Follow the last few steps but make the Feather lower and
use White for the fill.
24. Revert the Foreground and Background colors to black and
white.
25. In a new layer, choose Filter>Render>Clouds.
26. Set the cloudy layer to Screen Mode.
27. With a large-size eraser, erase the edges of the clouds to
from a cone shape emanating from the gun barrel.
|