|
Tutorials
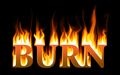
Start a Fire in Photoshop
11/05/2002
It was difficult to create fire using earlier versions of Photoshop.
Photoshop 7's Liquify feature has changed all that. On today's
show I'll show you how to use Liquify to create realistic fire.
Step by step
1. Create a new file that's square in shape and set the Background
to black.
2. Using White, type in a word you wish to set on fire.
3. Rasterize the text (Layer>Rasterize>Type).
4. Duplicate the layer with the type.
5. The first filter to be applied works only from the left or the
right. You want the effect to happen from bottom to top. Rotate
the duplicate text layer 90 degrees clockwise (Edit>Transform>Rotate
90 degrees clockwise).
6. Apply the Wind filter from the Left (Filter>Stylize>Wind).
Apply it a couple of times to get long streaks.
7. Rotate the layer back to its original upright position (Edit>Transform>Rotate
90 CCW).
8. Apply the Gaussian Blur filter (Filter>Blur>Gaussian Blur).
Give it just enough to soften the streaks.
9. Create a new layer behind the layer you just blurred and fill
it with black.
10. Merge the two layers. Make sure you do not merge the background
or the original text layer.
11. Go to the Liquify filter (Filter>Liquify). It should display
the currently selected layer (blurred, streaked text) to be modified.
12. Using the Warp and Turbulence tools within the Liquify filter,
distort the streaks into flames. Use small brush shapes and Warp
to pull out additional flames from the edges of the text.
13. When you feel you're done, click OK and exit Liquify.
14. Switch the mode of the layer to Screen. This exposes the
untouched underlying image where the top layer is black.
15. Go to the Hue/Saturation command (Image>Adjustments>Hue/Saturation).
Click the Colorize button to change the hue of the flames and set
it to a color that's a warm yellow, about 40 on the Hue bar. Push
the Saturation up to 100.
16. Duplicate the layer of the flames. Then go into the Hue/Saturation
command, turn off Colorize, and enter a hue change of minus 20.
This moves the yellow in the direction of orange.
17. Set the mode of the duplicate to Overlay. This introduces
some reds into the flames as seen.
18. Go back to the layer with the original white text and bring
it to the front.
19. Click the Lock Transparency button in the layer's palette
and fill the text with a gradient from yellow to dark brown.
You might
want to add a Layer Style of Inner Glow with Red for the color
and Normal for the mode.
|