|
Tutorials
Create a Digital Landscape
07/09/2002
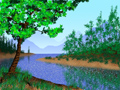
On today's show, I will show you how to create a landscape in
Adobe Photoshop. Below are the steps I used to create the image.
1.
The sky is added to the Background layer with the gradient
tool,
using a light blue at bottom to a darker blue at top.
2. In a new layer, shapes are created with the Lasso tool
to simulate mountain peaks. The selection is filled with
a darker
blue gradient.
The opacity is lowered to about 30 percent.
3. In another layer, more mountains are created to simulate
peaks further away. Their opacity is lowered to 10 percent.
If there
is any overlap, the mountains in the foreground are turned
into a selection (Control-click (or Command-click on a
Mac) on Layer
in the Layers' palette) and delete is pressed for the smaller
peaks.
4. A new layer is created and filled with a dark blue.
The Plastic Wrap filter is applied by clicking on the
Filter menu, pointing
to Artistic, and selecting Plastic Wrap.
5. Zoom out to expose work area. Distort layer to simulate
water by clicking on the Edit menu, pointing to Transform,
and selecting
Distort. The top handles are lowered to just below
the center area. The bottom handles are pulled way out to
the left and
right of
the image area.
6. In another layer, a shape is created to simulate
an island. It is filled with a gradient of brown
colors with the lighter
tones along the waters' edge. The Noise filter is
applied with a small
amount. Apply the Noise filter by clicking on the
Filter menu, pointing to Noise, and selecting Add Noise.
7. In another layer, simple vertical lines are drawn
with a small paintbrush to simulate tree trunks.
Using a custom
brush,
leaves
are added to the trees. Bushes are added beneath
the trees.
8. A new layer is created. All the layers that
make up the island are made visible. All other
layers
are made
invisible.
With the
new blank layer selected, Option (or Alt)-click
Merge Visible from the drop down menu in the
Layers' palette.
The resulting
layer
is moved to a position in the palette below the
island. The layer is then flipped vertically
by clicking
on the Edit
menu, pointing
to Transform, and selecting Flip Vertical.
9. The layer is skewed to line it up with the
island. To do this, click on the Edit menu,
point to Transform,
and
select
Skew.
The Motion Blur filter is applied with a vertical
direction by clicking
on Filter, pointing to Blur, and selecting
Motion Blur. The opacity is then lowered a slight bit.
10. The island procedure is repeated on the
left side of the image but smaller and darker.
11. In a layer, a small shape is created
to simulate land in the front where the
viewer is standing.
It is filled
with brown
colors.
The Texturizer filter is applied in Sandstone
mode by clicking on the Filter menu, pointing
to Texture,
and
selecting
Texturizer.
12. In another layer, with a paintbrush,
strokes are added to simulate a large
tree in the foreground.
The
Craquluere
filter
is applied
by clicking on the Filter menu, pointing
to Texture, and selecting Craquluere.
13. Finally, leaves are added to the
tree with the Maple leaf custom brush
and grass
is added
to the
ground with
the Grass
custom brush.
|